Monday, 30 January 2012

Fund Drive for Vaidehi Ashram with Raffle

In January Siri of Cooking with Siri mentioned in her Fb page that she went to visit Vaidehi Ashram for Destitude Girls in Hyderabad and that soon she will post about it and I mentioned to her I am looking forward for reading the post.

I remember reading the post and also seeing the pictures of the kids, especially the younger kids, it breaks your heart seeing them, and then that makes one think and  Siri had written in her post that when these kids have their food that not even a single piece of grain is wasted, they know the value of a grain.

Vaidehi Asharam, for girls they are young kids and girls, these kids have no family or sometimes they have a mom or dad but they dont have the means to look after them.
The girls are  taught fine arts such as music, painting, dance and handicrafts .

They are also provided with sufficient knowledge about good food and health which they in turn use to educate and empower women in nearby slum areas, which I thought is quite commendable.

You must read her post it is so touching and I am sure after you reading you will chip into the Fund Drive.
I know my mom used to go to a Orphanage in Cohin for my Dads anniversary and give them food, I also know that her youngest sister who is a widow does it too but then she goes to a home were old people are living.
Last year we lost our mom and I was in India for a while and then when I came back home my sister in B'lore told me they went to a Orphanage few hours drive from b'lore taking with them, rice, legumes, coconut etc... and while they were there they adopted a girl, well you can't take the lil girl to your home you pay for her food,clothes,schooling for each year.

If a donor donates 10$ then you gets 1 raffle tickets which can be used to bid for these Raffle Prizes
Ok you might say I do support other charity etc.... and I agree to you all fully, but  even if you give for other good causes, what is one more, the lowest you can pay is 10 $ and I am sure all of us can spare atleast 10 $.

1 Raffle Ticket = 10 $

2 Contibute Via Paypal or credit. You can donate any amount. Each $10 donation will give you one raffle ticket towards a raffle prize of your choice.

For Example, a donation of $20 will fetch you 2 raffle tickets which can be used to choose on any of the raffle prizes.

3. Once the donation process is completed, please forward your payment confirmation message to info(dot)siri(at)gmail.com, clearly specifying which raffle prize(s) you are interested in. Within 24 hours, your name and contributed amount will be added to the 'Fund Drive Supporters List' at the very end of this post. If you want to stay anonymous, please let me know in advance. For any correspondence/questions/queries, use the comment section or the email address mentioned.

To donate in Rupees:

1 raffle ticket = 500Rupees.

Please send an email to info(dot)siri(at)gmail.com for the bank account details where you can do a direct deposit and participate in the Fund Drive.

The event will close on 25th February and winners will be announced on 27th February via a randow drawing by the Ashram kids. :-)

What are the raffle prizes being sponsored?

Thanks to the amazing support from my blogger friends, you have 40+ raffle prizes to choose from, depending on where you live. All the raffle prizes are listed below in a table format for easy reference. For a more pictorial description of each of them - Click here.

The following raffle prizes make great gifts, and each item will be sent to the winner neatly packed and shipping expenses paid.

Please note that each one of these prizes can be chosen by multiple donors. A lucky dip will be conducted with the names associated and a winner will be chosen by the Ashram kids.
For supporting this Fund raiser I have donated a Cooking Book. The Perfect Scoop: Ice Creams, Sorbets, Granitas, and Sweet Accompaniments by David Lebovitz

If you want this book the code is RE 1
Just think like this,  you were planning to buy a prop for your blog to take better pictures, well don't buy that this time, donate the money for this good cause or was planning to buy something you saw in one of the clothes shop and you don't need it, but you like the color of that top or  shirt well don't buy it this time give that money for the Fund Drive, think about the joy these kids will have when they know that there are people in the world who cares about them.

Friday, 27 January 2012

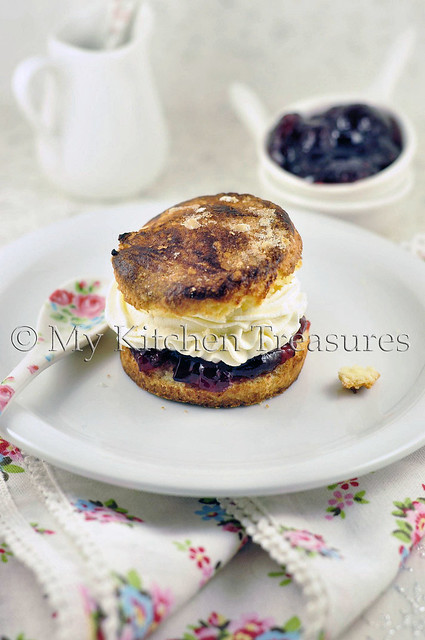
Daring Bakers January, 2012 Challenge, Back to Basics - Scones


To be honest I am not a huge fan of scones unlike me Hans and Shyama loves it.
When I saw in the Daring Bakers foroum I had plans to make them though, but then days went by and I like to make my DB challenge when Shyama is home, as she also can enjoy them, but she is having exams this month, so she doesn't come home on weekend, as she will loose too much travelling from her place to ours so she has been staying there.

But then two days back it was such a dull day, it was dark, rainy ,windy etc etc.... and I thought why not do the Daring bakers, another reason to do is also, middle of next month I am going to visit my sis for a month so then I might not be able to do next 2 months of DB, unless if I make then in her place.
I do eat them but Hans just love them, well he loves everything which has whipped cream, I on the other hand is not a huge fan of whipped cream.

Mine didn't rise as much , as I added less baking powder by mistake so don't blame the recipe it was my silly mistake.

I think I will make them again once with the correct amount of baking powder.
I served it cold as I wanted to serve them with whipped cream and Jam.
This months Daring bakers is hosted by Audax Artifex.
He is like the Guru of the DB ,everymonth when there is a new challenge you know that he would ahve made the challenge in the first day or two and then he will be there helping with lots of doubts etc.....
Recipe is his own which he made many times to perfect it.

Basic Scones (a.k.a. Basic Biscuits)
Servings: about eight 2-inch (5 cm) scones or five 3-inch (7½ cm) scones
Recipe can be doubled
Ingredients:
1 cup (240 ml) (140 gm/5 oz) plain (all-purpose) flour
2 teaspoons (10 ml) (10 gm) (⅓ oz) fresh baking powder
¼ teaspoon (1¼ ml) (1½ gm) salt
2 tablespoons (30 gm/1 oz) frozen grated butter (or a combination of lard and butter)
approximately ½ cup (120 ml) cold milk
optional 1 tablespoon milk, for glazing the tops of the scones
Directions:
1. Preheat oven to very hot 475°F/240°C/gas mark 9.
2. Triple sift the dry ingredients into a large bowl. (If your room temperature is very hot refrigerate the sifted ingredients until cold.)
3. Rub the frozen grated butter (or combination of fats) into the dry ingredients until it resembles very coarse bread crumbs with some pea-sized pieces if you want flaky scones or until it resembles coarse beach sand if you want tender scones.
4. Add nearly all of the liquid at once into the rubbed-in flour/fat mixture and mix until it just forms a sticky dough (add the remaining liquid if needed). The wetter the dough the lighter the scones (biscuits) will be!
5. Turn the dough out onto a lightly floured board, lightly flour the top of the dough. To achieve an even homogeneous crumb to your scones knead very gently about 4 or 5 times (do not press too firmly) the dough until it is smooth. To achieve a layered effect in your scones knead very gently once (do not press too firmly) then fold and turn the kneaded dough about 3 or 4 times until the dough has formed a smooth texture. (Use a floured plastic scraper to help you knead and/or fold and turn the dough if you wish.)
6. Pat or roll out the dough into a 6 inch by 4 inch rectangle by about ¾ inch thick (15¼ cm by 10 cm by 2 cm thick). Using a well-floured 2-inch (5 cm) scone cutter (biscuit cutter), stamp out without twisting six 2-inch (5 cm) rounds, gently reform the scraps into another ¾ inch (2 cm) layer and cut two more scones (these two scones will not raise as well as the others since the extra handling will slightly toughen the dough). Or use a well-floured sharp knife to form squares or wedges as you desire.
7. Place the rounds just touching on a baking dish if you wish to have soft-sided scones or place the rounds spaced widely apart on the baking dish if you wish to have crisp-sided scones. Glaze the tops with milk if you want a golden colour on your scones or lightly flour if you want a more traditional look to your scones.
8. Bake in the preheated very hot oven for about 10 minutes (check at 8 minutes since home ovens at these high temperatures are very unreliable) until the scones are well risen and are lightly coloured on the tops. The scones are ready when the sides are set.
9. Immediately place onto cooling rack to stop the cooking process, serve while still warm. recipe and he tried it so many times to perfect it.

Monday, 23 January 2012

Macaron With Cacao Butter Cream


Yeah yeah I know you all are saying again there she is with her Macarons.Truth be told If I could I would make them every day, as they are so elegant and beautiful to look at.
They do indeed taste good, even though they are sweet.
I think what makes Macarons taste special is their filling.
And I have told you in my earlier posts Hans who goes nuts when I make them, but truth be told he is turing around, he do like/Tolerate these beauties, especially if the filling is special and if it is spiked up with Boose :-)
You can see I had lot of free time yesterday as I was home alone  so wrote a elaborated post .

A macaron  is a sweet meringue-based confectionery made with egg whites, icing sugar, granulated sugar, almond powder or ground almond, and food coloring.

The confectionery is characterised by its smooth, domed top, ruffled circumference (referred to as the "foot"), and flat base. It is mildly moist and easily melts in the mouth.
Although predominantly a French confection, there has been much debate about its origins. Larousse Gastronomique cites the macaron as being created in 1791 in a convent near Cormery. Some have traced its French debut back to the arrival of Catherine de' Medici's Italian pastry chefs whom she brought with her in 1533 upon marrying Henry II of France.

In the 1830s, macarons were served two-by-two with the addition of jams, liqueurs, and spices. The macaron as it is known today was called the "Gerbet" or the "Paris macaron" and is the creation of Pierre Desfontaines of the French pâtisserie Ladurée, composed of two almond meringue discs filled with a layer of buttercream, jam, or ganache filling.
Thankyou Wikipedia for all the information, what will I do without you :-)

I used to draw circle on my baking paper untill I found this link from Meeta's place for these Templates.

Which made my life easier as I just had to print and just slip it under my baking paper and I has perfect cirlces for my Macarons.
I think the macarons are better kept a day in a tupperware closed in the fridge, but I have to admit I eat them the day itself one or two and the rest I keep in the fridge.
When I use butter cream filling, till now I have kept them for 5 days in the fridge and each day for afternoon coffee I take few and bring to the table.
This is a step by step pic from another Macaron post, used this as I didn't take pic this time.

I always stick to my Ottelonghi book, which till now has not failed me.
110gm icing sugar
60gm almond flour
60gm egg whites (of 2 eggs) ( Normally you have to age the egg whites, which I suggest you do too, but these days I find myself not agening them but I don't take the freshest egg, I just take egg which is atleast a week old and then make the Macarons when ever I want as I don't like the agening part of the whites as I am a impulisive baker, but don't listen to me age you eggs )
40gm castor sugar
Few drops of any food colour

Whiz the almond flour and icing sugar in the coffee grinder and sift 2-3 times
Whisk the egg whites and castor sugar till it forms a thick aerated meringue, firm but not too dry.
Turn the nut mixture into the bowl, and fold gently to get a lava type batter.Hold the tray firmly and tap the underside firmly. This should help to spread and smooth out the macarons.
Leave out, uncovered for 15 minutes.
Meanwhile preheat the oven to 150C (the original recipe has 170C).
Bake in preheated oven for about 15 to 17 minutes. They are ready when they readily leave the paper when liften with a palette knife. Remove from oven as soon as this happens, and leave to cool completely.
I take out the macaron shells when I take them out from the oven, and I do this trick always, slpash a little bit of water unders the baking paper which allows the Macaron to lift from the baking paper easily.

Vanila Butter Cream: Source Tartlette
1/2 cup (100gr) sugar
2 large egg whites
1 1/2 sticks (6 ounces) unsalted butter, at room temperature
Few tbsp of Cacao liqueur

Put the sugar and egg whites in a large heatproof bowl over a saucepan of simmering water and whisk constantly, keeping the mixture over the heat, until it feels hot to the touch, about 3 minutes.
The sugar should be dissolved, and the mixture will look like marshmallow cream.

Pour the mixture into the bowl of a stand mixer fitted with the whisk attachment and beat the meringue on medium speed until it cools and forms a thick shiny meringue, about 5 minutes.
Switch to the paddle attachment and add the butter, one tablespoon at a time, beating until smooth. Once all the butter is in, beat in the buttercream on medium-high speed until it is thick and very smooth, 6-10 minutes.
Add the liqueur to the buttercream and fold with a spatula until fully incorporated.
If not using right away, refrigerate for up to a week or freeze for up to 1 month.
Sending this to this months Mactweet.

Wednesday, 18 January 2012

Chicken With Garlic Sauce


Back at home if you went to have chinese food, it was Chilly Chicken, Chicken Manchurian , some kind of noodles etc....... and if you eat these dishes they were super spicy which we all loved it.
Just thinking about those spicy dishes make me drool.
So in 91 Hans and I was in Bombay ( Mumbai) and we stayed there for few days before going back to Belgium and we went to a Chinese Restaurant I can see the street in my mind but don't know the name I am sure Hans remember the name ( will ask him when he comes home)
So we went to this posh looking Chinese Restaurant and they gave us the menu card and I was expecting the usual Spicy Chillie Chicken etc.... but the dishes in the menu card was totally newto me and we ordered our dishes and I have to say I was ( We) blown away, the food was totally different than the chinese we were used to and even the dishes were present in such a way example on top of some seaweed etc......and the taste it was nothing like i have ever had, the dishes were not that spicy but they were really so super yumm.

That is what I think about this Chicken dish. It is not spicy at all there is not even a chillie in the dish.
It is really authentic , it has to be,as it comes from Bee's book Easy Chinese Cook Book.
As you know I am in love with this book, I have made few dishes and it always comes out delicious like this Kung Pao Chicken.
I always use the tenderizing method Bee mentioned.

250 gm skinless chicken breast, cut into bite sized cubes
1 wood ear mushroom
1 tsp chinese rice wine or Sherry
1 tbsp corn starch
3 tbsp oil
3 - 4 garlic minced
1/2 bell peper deseeded and cut into pieces , i used red one
50 gm canned bamboo shoots, rinsed
2 green onions  trimmes and cut into pieces

Sauce
2 tbsp soy sauce
3/4 tsp dark soy sauce ( i didn't use i just took the amount of normal soysauce i have)
1 tbsp chinese black vinegar
1 tsp chillie oil
1/2 tsp sugar
3 tbsp of water
1 heap tsp pf worn starch
Peper and salt to taste.
( I used more of these amount written as I wanted to have more sauce, so used much more of soy sauce, water,corn starch etc )

Treat the chicken according to ow to tenderize te chicken. This is a optional step.
Soak the wood ear mushroom in warm water,about 15 minutes and then cut into pieces.
Marinalte the cicken pieces with rice wine and corn starch for 10 minutes.
Mix all te ingridients for the sauce in a small bowl and set aside.

Heat 1 tbsp of te oil in a wok over a high heat.
 Add the chicken and stir fry untill it is half cooked or turned opaque.
Dish out and set aside.
Heat the remaining 2 tbsp of oil in the wok over hight eat. Add te garlic and stir fry untill aromatic, then add the wood ear mushroom, bell peppers and bamboo shoots.
Stir fry the ingridients  untill you smell the pepprey aroma from te pappers, about 1 minute.
Return te chicken into the wok, stirring well to combine with the ingridients. Pour in the sauce and stir continously untill the chicken meat is well coated with teh sauce. Stri in the green onions, dish out and serve with steamed rice.

Sunday, 15 January 2012

Trying to be a MasterChef


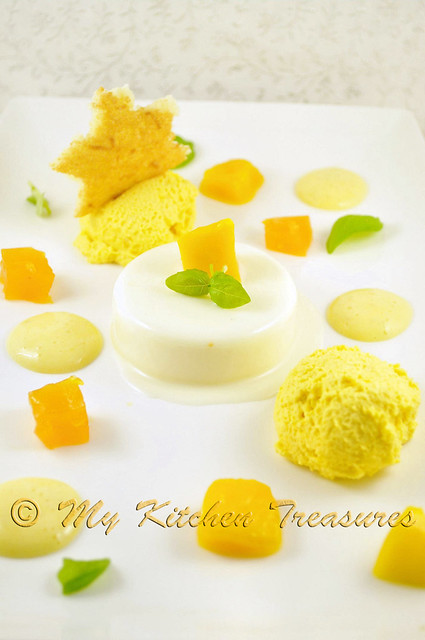
Coconut cream with passion fruit jelly, lime curd, mango mousse and pineapple
It is Sunday morning and here i am sitting and writing a post for my blog.
You would be saying what are you doing writting a post on a sunday, normally on a sunday I hardly have time to come near the computer ( I am sure I have written that I never check on blog post on weekend) well this sunday is a exception.
I am home alone can you see my sad face :-) well Shyama went back to her college yesterday after beeing at home for 3 weeks and her exams starts on Tuesday, and Hans is having a Orchestra day so he left early morning.
So what do I do, I just vegetate infornt of the computer and then decided I will write a new post for my blog.
Oh I do have lots of work at home just that I am not in a mood to do all the houshold c

Now to the recipe, from the time they Started Showing in BBC Master Chef The Professionals and this year it has been the same.
And especially when it reach the semifinals then I watch it every evening.
So in the end I make hans watch it too not that he can escape it as when he comes home in the evneing I will say you know which programme is on TV and I watch it and he watch it with me as I tell him if i can watch all this Documentry etc.... he can watch this programme with me too.
So as Christmas was nearing, and the Masterchef was in full swing , he told me as I have been forcing him to watch the programme and making him drool for the food he sees in TV i should try something from the programme for the Christmas eve Dinner so that is what I did.
Made this super Delicious dessert, which did take a bit of time and effort but it was worth it as everybody LOVED the Dessert.
The recipe was from Steve one of the finalist and while eating the dessert Hans remarked now I know what they are tlaking about when the judges taste the dishes, the judges talk about diffferent taste, texture and taste exploding in their mouth, he said well when you eat this dessert you really know what they are tlaking about :-)

Normally when I make a dessert for a dinner party I hardly have time to take a picture, but this time I thought as i put so much effort into making this delicious dessert I should take the picture fast.
The pics don't do justice to the dessert as I was in a hurry to take them.

This tropical fruit dessert is the ultimate way to bring some island sunshine into the kitchen.

Ingredients

For the coconut cream
  • 4 gelatine leaves
  • 250ml/9fl oz double cream
  • 80g/3oz caster sugar
  • 250ml/9fl oz fresh coconut purée
For the passionfruit jelly
  • 2 gelatine leaves
  • 75ml/2½oz passion fruit purée
  • 55g/2oz caster sugar
For the mango mousse
  • 1½ gelatine leaves
  • 175ml/6fl oz double cream
  • 18g/¾oz icing sugar
  • 125g/4oz mango purée
For the lime curd
  • 2 free-range eggs
  • 60g/2oz sugar
  • 50ml/2oz double cream
  • 2 limes, juice and zest
For the coconut tuile
  • 45g/2oz sugar
  • 20g/1oz butter   at room temperature
  • 1 free-range egg white
  • 15g/½oz flour
  • 17g/½oz desiccated coconut
To serve
  • fresh pineapple, chopped
  • fresh mango, chopped

Preparation method

  1. For the coconut cream, place the gelatine leaves into a bowl of cold water to soften.
  2. Place the cream, sugar and fresh coconut purée into a pan and bring to the boil. Reduce the heat and simmer for 1-2 minutes, then remove from the heat. Squeeze out any excess water from the gelatine and add to the hot coconut mixture, stirring until dissolved.
  3. Cover one end of four chef’s rings with a double layer of cling film and place onto a baking tray. Pour in the coconut cream, then place into the fridge to chill until set.
  4. For the passionfruit jelly, place the gelatine leaves into a bowl of cold water to soften. Heat the passionfruit purée and sugar in a pan over a medium heat, stirring until the sugar has dissolved. Squeeze out any excess water from the gelatine and add to the passionfruit mixture, stirring until dissolved. Pour the mixture into a tray lined with cling film and place into the fridge to chill until set. Before serving, cut the jelly into small cubes.
  5. For the mango mousse, place the gelatine leaves into a bowl of cold water to soften. Whip the cream with the sugar until soft peaks form when the whisk is removed.
  6. Heat 50g/2oz of the mango purée in a small pan. Squeeze out any excess water from the gelatine and add to the mango purée, stirring until dissolved. Stir this mixture into the remaining mango purée, then fold in the whipped cream mixture. Transfer to a container and place into the fridge to chill until set.
  7. For the lime curd, place the eggs, sugar, cream and lime juice into a heatproof bowl set over a pan of simmering water (make sure the bottom of the bowl does not touch the water), whisking continuously until the mixture thickens, about five minutes. Stir in the lime zest, then place into the fridge to chill until ready to serve.
  8. Preheat the oven to 180C/350F/Gas 4.
  9. For the coconut tuile, cream the sugar and butter in a bowl until pale and fluffy, then add the egg whites and beat until smooth and well combined. Fold in the flour and desiccated coconut until the mixture comes together to form a thick paste. Spread the mixture out on a silicone baking sheet, using a palette knife, until about 3mm thick. Bake for 8-12 minutes, or until golden-brown and crisp.
  10. Remove the tuile from the oven and set aside to cool for one minute before cutting out your desired shapes.
  11. To serve, carefully slide a knife around the inside of the chef’s rings, gently peel away the cling film and turn the coconut creams out onto serving plates. Make quenelles out of the mango mousse and place alongside the coconut cream, then dot the plate with lime curd and passionfruit jelly. Garnish the mousse with the coconut tuile, then scatter the fresh mango and pineapple around the plate.


    Wednesday, 11 January 2012

    Chocolate and Banana Cup Cakes


    I do hope all my friends and readers of MKT had a fabulous New year.
    I know it is a tad bit late to ask about Newyear but then here they say the whole month of January you can wish new year :-)
    I wanted to share a super dessert I made for Christmas eve party, but then I got this New lens from Hans as a present so I wanted to try that lens for taking food picture so instead of posting that super special dessert I am posting this simple and easy cupcake.

    It is ages ago I made cup cake , I do love them though there has been so much cup cakes here in blog that I say to myself should I post again another one.
    But then I think cupcakes are so easy to make especially for afternoons coffee which I have been doing ,has Shyama is home as she is having study holiday as her exams in college will start in middle of january.
    So I try to spoil ehr with my baking and I for one is so glad that she is home and that I can bake :-)

    Now to the recipe, I love chocolate and banana combination, that is a real classic combo.
    Now about the frosting for this cupcake, I made the frosting and when I added sour cream the mix looked like it curdeled, so I started again throwing the firts frosting, and I was carefull when I mixed in the sour cream, but it still look a bit curdeld than the usual frositng I have which is always so smooth and fluffy. So i guess it is the adding of sour cream which makes it look like curdeled.
    I was saying to my family maybe then i should not sue sour cream for the frosting and then shyama said oh no she loves the tnagy taste the sour cream gives to the frosting.

    According to the author this makes a rich chocolate dark cupcake. ( I do agree)
    Serious chocoholics should opt for a chocolate butter cream frosting which i will try next time as I love chocolate.
    The recipe is from the Book Cupcakes by Janet Smith
    Makes 24 regular size cakes.
    1/2 cup ( 130g ) soft butter
    1/2 cup ( 130g ) fine sugar
    1 cup ( 130g ) self raising flourµ2 heaping tbsp of cocoa powder
    3 eggs
    3 ripe bananas
    1 lever teaspoon baking powder

    For the Whipped sour cream frosting. ( the amount which i given below is the amount given in the book, as they just gave a small amount I like lots of frosting so i doubled the recipe )
    1/4 cup ( 50 g ) soft butter
    2/3 cup ( 110g ) icing sugar
    4 heaping tablespoon thick sour cream
    1 tsp vanilla extract ot to your taste
    Food colour of your choice if you are using.

    Preaheat the oven to 350° F (180° C/ Gas 4) and put 24 regular paper case into the cupcake pan.
    Put the butter, sugar, flour, cocoa and eggs in a bowl and beat together until it is free from lumps.

    Put the bananas in a another bowl and mash, leaving a few chunks.
    Sprinkle the baking powder over the bananas and mix again.
    Tip the banana mixture into the chocolate mixture and stir together.
    Divide the mixture among the paper cases and bake for 15 to 20 minutes until nicely risen and springywhen presses.
    Remove the cakes and allow to cool on the wire rack/
    Swril or pipe your frosting.
    For the Frosting.
    Put butter and sugar in a bowl and whisk with a electric hand held whisk until very pale. Add the sour cream and keep whisking to make it light and frosting.
    Add vanilla extract to taste. And the food color if you are using.
    Swril the frosting on top of the cakes.